
Sabbatical Adventures in Indonesia!
- Christianne Myers
- Mar 28
- 6 min read


I'm here in Jogja- Yogayakarta, Indonesia. I'm posting almost every day on Instagram, so you can see lots of photos about my travels there @costumedesignercm. For this post, I'm going to focus on my residency at PaperMoon, and building a puppet. I'm staying in their beautiful, very rustic, residency house, in a neighborhood that is just south of the center of Jogja. I managed to arrive during the biggest holiday of the year, but everybody's been awesome and welcoming, and there have still been a lot of activities and things to do to keep busy. I met everybody, got introduced to the studio and their resources there so that I could work independently during the holiday.
The studio, from the residency, is less than a mile away- about a twenty minute walk. This is where they rehearse and build all their pieces. The studio is three buildings: a big open space where they rehearse- that is surrounded by light, and you open all the windows, the shutters, and just let the fresh air in. It has a short, lofted area where there's fabric and a sewing machine . Then there's a little chalet shaped outer building where they often host events, and where I'll be doing talk for the community right before I leave. And then there’s the workshop for building where there's tools and a workbench.


Onto the puppet: I'm developing a short autobiographical piece called Avian Lumina. Last November, I figured out a story that I wanted to tell, and it’s a reflection of my experience on 9/11- I'll write about that process later. For now, my project while I'm here is to build a direct manipulation, tabletop, puppet that can be worked by one or two people. I'm still figuring out how many other versions of this character I need in puppet form and what the functionality is. As I tell students all the time, a puppet does what it does, and that's what it does. So, you have to know what you want it to do in order for the functionality to be part of the design process even though sometimes you discover other things that the puppet can do, after you've made it. I was on a zoom workshop with Tom Lee a couple weeks ago, and he said, “You're always in tech.
You're never not in tech when you're working on a puppet piece, because you don't know what you need until you try something.” So, my goal is to leave here with a functioning puppet, and know that there might be future versions of it. I arrived with a sketch that I worked from to get started.

Anton, who does a lot of their technical work, suggested I draw the puppet to full size so that I could use it as a pattern for developing pieces and make sure everything was to scale, which was very wise.
I made a detailed drawing so I had fewer decisions to make once I started sculpting. I started with the face, because that's something I could easily do independently. Sculpting in clay I started rough, remembering how I worked in wood for the marionette with Puppets in Prague six years ago. I was really being bold about scooping out eye sockets and making sure there's enough depth, and really focusing on bone structure, and then adding clay to add flesh and skin. It's a puppet, not a portrait, so it's not realistic- the eyes are bigger, the bones of the eyebrows are heightened and the mouth is small. It took me about eight hours to complete sculpting in clay. I then covered it tightly in plastic wrap, and started to paper mâché.


On hand, they have this beautiful, thin brown paper that has a really lovely toothy texture that softens beautifully and rips on grain very easily. It's very lightweight but still opaque; once you soak it, it gets very malleable. They work with a good basic PVA wood glue, which I watered down a little bit, just to get it nice and slimy. Definitely cheaper than modpodge. I got in the rhythm of ripping strips of brown paper, soaking them in a little bit of water, just to get them soft, and then getting my hands covered with the glue, and then using the clay tools to really get the paper into the grooves of what I carved. I've been very careful not to have any undercuts, which would be tricky to release.


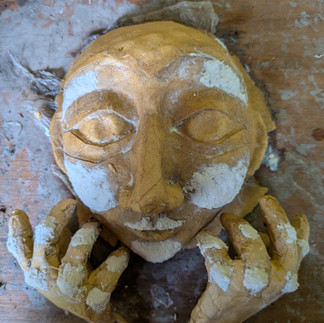


Earlier this week I completed two layers and then went away for some drying time because it's so humid here and I didn't want it to get moldy. The next day it was pretty dry, so I added two more layers and started to make the hands. This is going to be direct manipulation or maybe with a short rod at the wrist, so the hands themselves don't need to pick up anything. They are a generic enough shape that they could point, but I don't need them to do anything or change shape.
I made a very simple wire armature of the hands, and then I bulked up the shape of the hands just with some tape and paper, and a cotton pad to get a little bit of bulk. I covered that with masking tape to seal it up, and then did one layer of paper mache over that. Then, I bent the fingers into an interesting shape while everything was still wet. Back to the face, after three layers of papier mâché, I wanted to add a little more dimension, to help pick up highlights later for when I go to paint it. I used a little bit of paper clay to add a little bit of height to the roundness of the cheek and the brow bone, the tip of the nose, the tip of the chin, just to add a little bit of depth overall. Then I did the same thing to the hands. After I did two layers of paper mâché on the hands, I really wanted to age the hands a little bit. They were looking a little pudgy, and young, and so I added little crests to mark the knuckles on the fingers and the thumb and across the top of the back of the hand. Once that had set, I did more paper mâché on top. I ended up with 5 layers of brown paper, and then one very thin layer of tissue on top of it.
Back in the studio today, everything still needs a little more drying time. So I started on the back of the skull, using a bowl as a mold that is the right diameter. Once everything is dry, the next step is going to be to release the face from the clay. Rather than try to pry the clay out, at Papermoon, they usually cut the hardened paper mâché into three pieces to save the original sculpt, and then paper mâché them back together, which makes sense since I’ll need to seam the skull as well. Plus I’m hoping to make a second face while I’m here to have a backup, so I want to avoid wrecking the clay.
Today I was able to start to work on the body! This is where I'm so excited to work with the company and especially learn from Anton. When I first got here, once they understood the project I wanted to do, they pulled out all these puppets to undress and dissect them a bit. You can see from the photos, there are puppets everywhere. The body of their work has a specific style to it, but they work in all kinds of scales and articulations. They have these small figures and then they've got these giant walk around pieces, as well as some masks. For the most part, they are all made from paper mâché and rattan.


Rattan is the magic material that I've been missing. I've seen some amazing puppets that are all made from wood, or any number of other materials, and there's certainly great skill in carving wood into shapes and forms, whether it's string puppets or rod puppets. I want this puppet to be really light, and the more wood you use, the heavier it gets, very quickly. While the central rod and the shoulder plate are wood, the structure of the ribcage and the pelvis are made from different weights of rattan. The amazing thing about this material is you don't need to wet it. You just bend it. It bends easily like a stiff wire, and then it holds its shape. Depending on the depth of the curve, you can straighten it and remanipulate it. It does not like to do super tight curves, and I am learning what the max bend is before it actually cracks or, or splits. As long as I live within that range, it is this incredible material for adding structure that is just so incredibly light. With Anton’s guidance today, the core is now complete! He drilled and cut the hardwood, and I molded the rattan and assembled everything. The waist is two linked wires covered in foam and all the joints are duct tape, which starts to release in the humidity, and hot glue! I think once I’m back home I may dress the joints with something a bit more natural looking, but for now, the functionality is really coming along! Next week we’ll work on limbs, finishing the head, and bringing her to life.
Enjoying your blog!! - Val Ramshur here